
How to Reduce Glare in Outdoor Lighting
Outdoor lighting should make a space easier and more comfortable to use—not make people squint when they walk past it.
For residential and commercial projects, excessive glare can come from several different factors, including the beam angle, light distribution, mounting height, shielding, color temperature, and fixture spacing.
So, how to reduce glare in outdoor lighting?
The answer is not simply to use a lower-wattage lamp.
A better approach is to control where the light goes, how much light reaches the eye, and how the fixtures are positioned within the space.
This guide explains the practical factors I would check when designing or selecting outdoor lighting for a project.
Quick Answer: How to Reduce Glare in Outdoor Lighting
To reduce glare in outdoor lighting, focus on these seven areas:
- Choose the right beam angle
- Use proper shielding
- Adjust mounting height
- Select suitable light distribution
- Choose an appropriate color temperature
- Avoid excessive fixture spacing or overlapping beams
- Test the lighting layout before bulk installation
The goal is not simply to make the lighting darker.
The goal is to create comfortable, controlled illumination.
1. How to Reduce Glare in Outdoor Lighting: Start With Beam Angle
Beam angle determines how widely light spreads from the fixture.
A narrow beam concentrates light into a smaller area, while a wider beam distributes light over a larger area.
This can significantly affect perceived glare.
For example, a narrow, high-intensity beam aimed toward a pedestrian’s line of sight can create a strong bright spot.
A wider distribution may provide more uniform illumination without concentrating the same amount of light into one small area.
When selecting an outdoor fixture, consider:
- Target area
- Distance from the fixture
- Mounting height
- Desired illumination level
- Viewing direction
- Surrounding architecture
The right beam angle depends on the application.
A facade, pathway, garden, wall, and entrance may require very different optical distributions.
What Is Beam Angle?
Beam angle is an important factor when selecting an outdoor lighting fixture. It describes the angular spread of light from the fixture and helps determine how the light is distributed across the target area.
For a more technical definition, see the Illuminating Engineering Society’s definition of beam angle.
2.How to Reduce Glare in Outdoor Lighting With Proper Shielding
One of the simplest ways to reduce glare in outdoor lighting is to prevent the light source from being directly visible from common viewing positions.
This is where shielding becomes important.
A fixture can use:
- A recessed light source
- A shield
- A hood
- A louver
- A deeper housing
- An anti-glare structure
- A carefully designed diffuser
The principle is straightforward:
If people can directly see a very bright LED source, the fixture has a higher potential for uncomfortable glare.
This is particularly important around:
- Walkways
- Entrances
- Residential driveways
- Hotel gardens
- Outdoor restaurants
- Villa terraces
- Commercial pathways
For architectural outdoor lighting, aesthetics and optical control should be considered together.
3. How to Reduce Glare in Outdoor Lighting: Check Mounting Height
Mounting height changes the angle at which people see the light source.
A fixture installed too low may place the light source directly within the normal field of view.
A fixture installed at a more appropriate height can direct illumination toward the intended surface while reducing direct visibility.
However, higher is not automatically better.
The mounting height should be considered together with:
- Beam angle
- Light distribution
- Fixture output
- Target surface
- Pedestrian viewing angle
- Spacing between fixtures
For example, outdoor wall lights around a villa entrance may require a different mounting position from lights installed along a commercial walkway.
This is why lighting design should consider the fixture and its installation environment as one system.
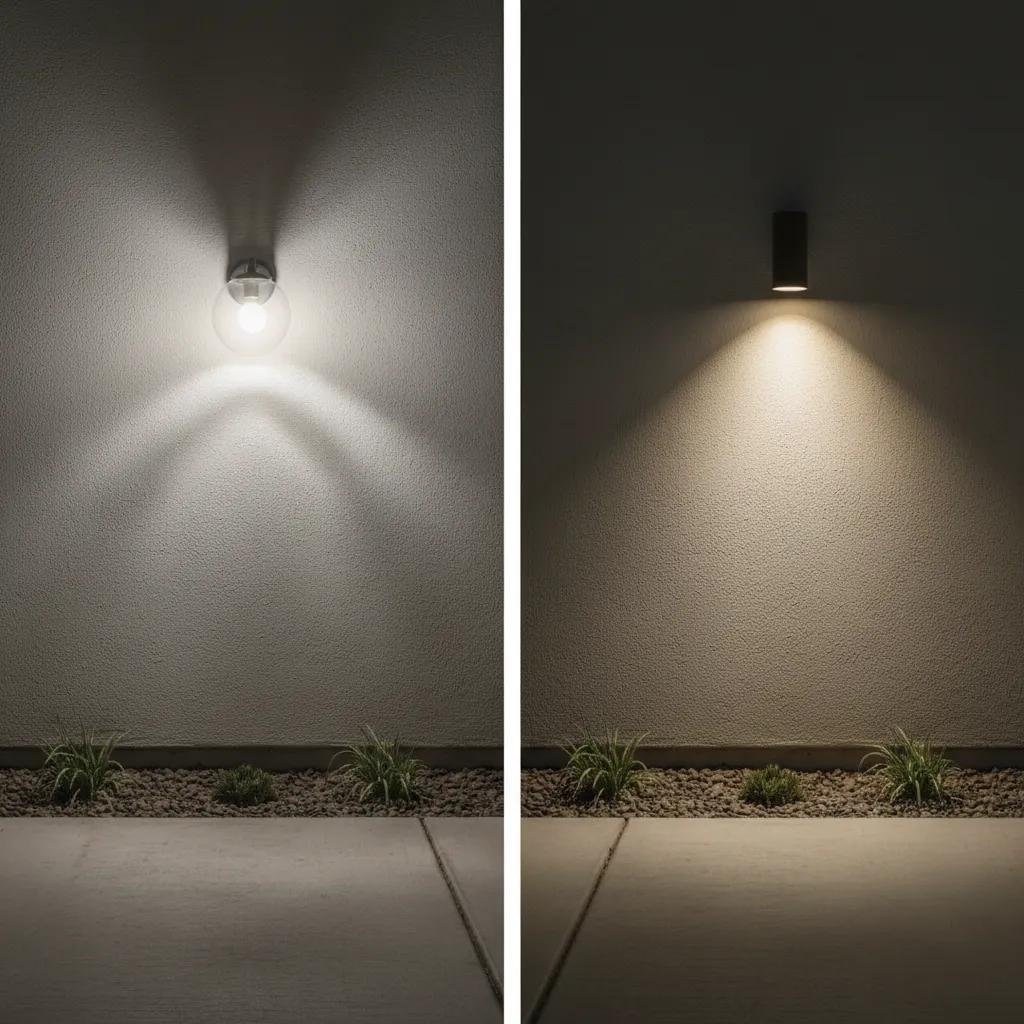
4. How to Reduce Glare in Outdoor Lighting: Test the Layout
Another important factor when considering how to reduce glare in outdoor lighting is light distribution.
Two fixtures can have similar wattage and lumen output but create very different visual experiences.
One may produce a concentrated hotspot.
Another may spread light more evenly across the target area.
For project applications, look at the actual distribution pattern rather than only the wattage.
Ask:
Where is the light going?
Not just:
How much light does the fixture produce?
For example:
- Wall washing requires controlled distribution across a vertical surface.
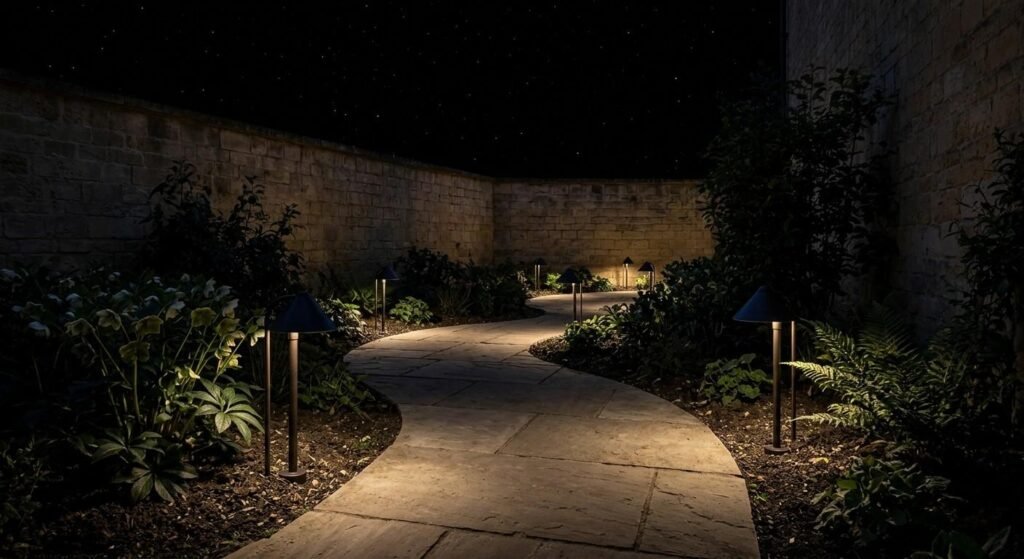
- Pathway lighting needs useful light on the walking area.
- Garden lighting may need a softer distribution.
- Facade lighting may require controlled vertical illumination.
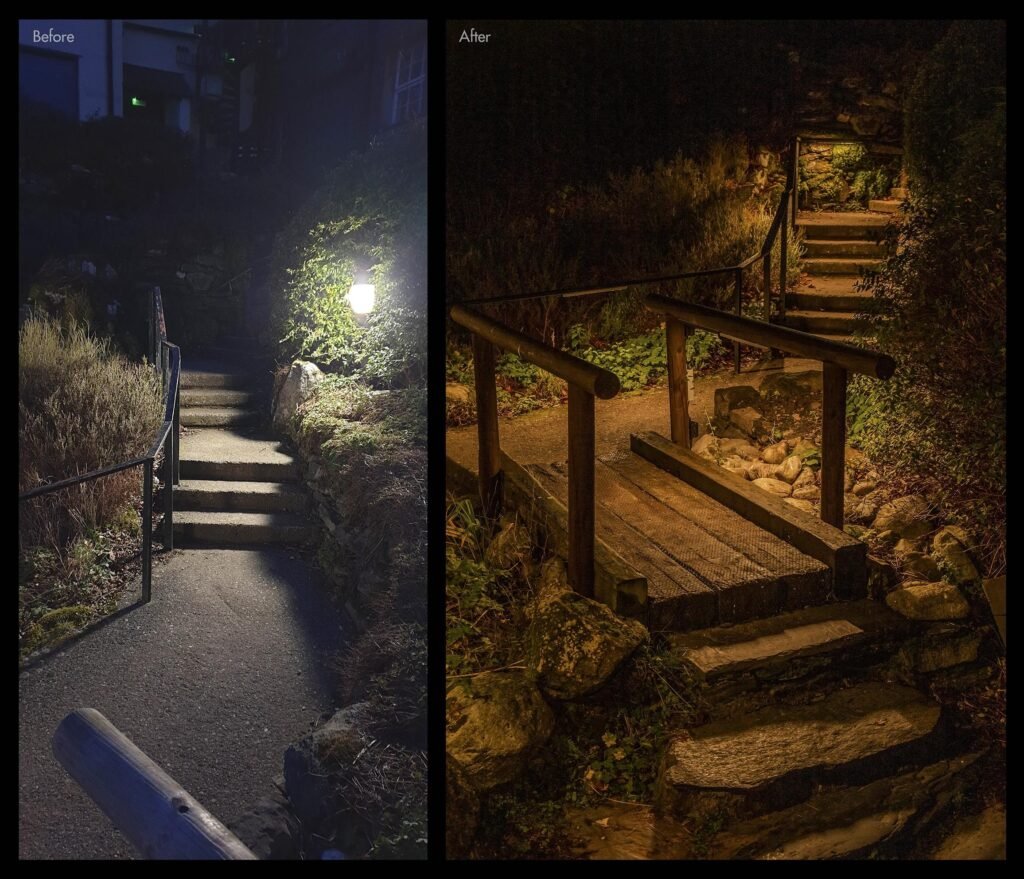
- Step lighting should illuminate the step without shining directly into people’s eyes.
The distribution pattern should match the purpose of the lighting.
5. Choose the Right Color Temperature
Color temperature does not directly eliminate glare, but it can affect how people perceive the lighting environment.
Outdoor projects commonly use different color temperatures depending on the application and desired atmosphere.
For example:
2700K–3000K
Often creates a warmer and more residential atmosphere.
4000K
Provides a more neutral appearance and may suit some commercial or architectural applications.
The right choice depends on the project.
However, color temperature should not be used as a substitute for proper optical design.
A poorly shielded, overly bright fixture can still create glare regardless of whether it uses warm or cool light.
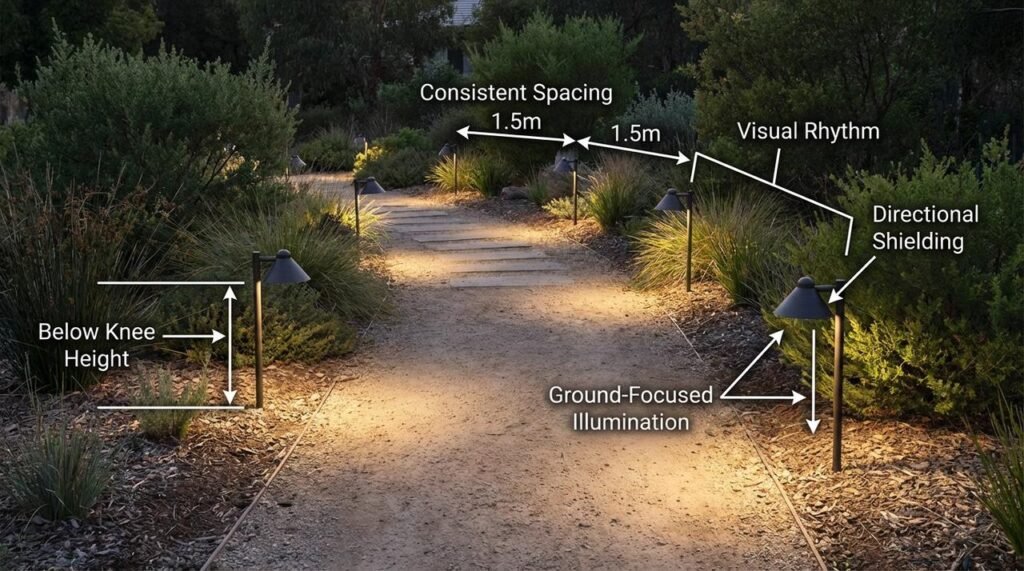
6. Plan Fixture Spacing Carefully
Spacing is another practical factor in outdoor lighting design.
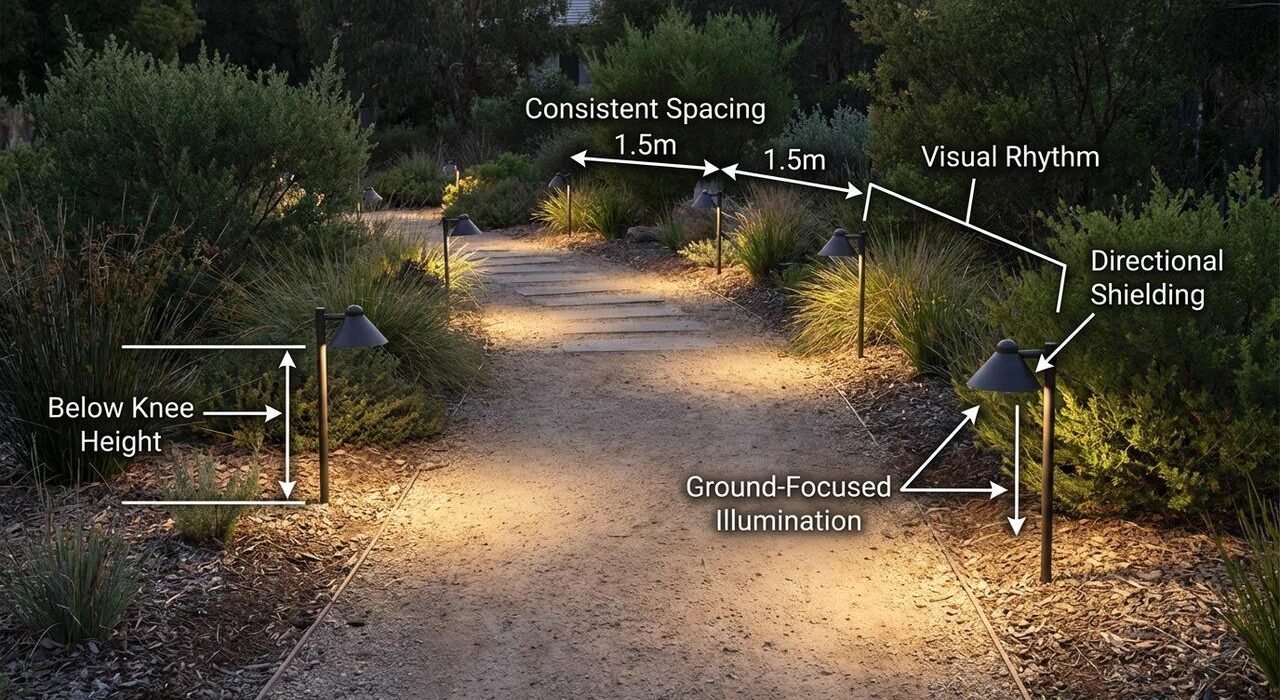
If fixtures are placed too close together, their beams may overlap excessively and create areas that are brighter than necessary.
If they are placed too far apart, dark spots may appear.
Neither situation creates a balanced lighting environment.
When planning spacing, consider:
- Fixture lumen output
- Beam angle
- Mounting height
- Light distribution
- Target surface
- Required illumination
- Surrounding ambient light
For pathway and landscape projects, it is better to design the spacing around the actual light distribution rather than simply placing fixtures at equal distances.
Uniform spacing does not always mean uniform lighting.
7. Test the Lighting Layout Before Installation
If you are purchasing outdoor lighting for a large project, testing is one of the most useful ways to reduce glare in outdoor lighting before the installation is complete.
A product can look excellent in a product photo and still produce unwanted glare in a real environment.
Before a large installation, consider testing:
- Actual mounting height
- Viewing angles
- Beam distribution
- Fixture spacing
- Color temperature
- Shielding
- Brightness on nearby surfaces
- Visibility of the LED source
For larger projects, a sample installation or lighting simulation can help identify problems before they become expensive installation changes.
DFMJ Expert Insight: Glare Is Usually a System Problem
From a manufacturing perspective, I would not look at glare as simply a “brightness problem.”
A fixture can have moderate power and still feel uncomfortable if the light source is exposed directly to the eye.
On the other hand, a higher-output fixture can sometimes create a comfortable result when the optical system is properly designed and the light is directed where it is needed.
When we evaluate an outdoor lighting product, I would look at several factors together:
Light source + optics + shielding + housing + installation position
This is particularly important for architectural outdoor lighting.
The fixture should not only look good when it is switched off.
It should also produce the right visual effect when people are actually using the space.
Real Project Tip: Don’t Test Outdoor Lights Only on a Factory Table
This is one practical point I would recommend to project buyers.
When evaluating a sample, don’t only place the light on a table and check whether it looks bright enough.
Try to evaluate it in a situation that is closer to the final project.
For example:
Villa project:
Check the light from the driveway, entrance and garden.
Hotel project:
Check the fixture from normal pedestrian viewing angles.
Commercial walkway:
Walk toward the fixture and observe whether the LED source is directly visible.
Facade project:
Check whether the light is illuminating the wall rather than creating unnecessary brightness in the viewer’s field of vision.
A five-minute real-environment test can reveal problems that a product specification sheet cannot.
How to Reduce Glare in Outdoor Lighting: A Simple Project Checklist
Before approving an outdoor lighting fixture, I recommend checking these points:
- Is the LED source directly visible?
- Is the beam angle suitable for the target area?
- Does the fixture have adequate shielding?
- Is the mounting height appropriate?
- Is the light distribution suitable?
- Is the color temperature appropriate for the project?
- Is the spacing based on the actual distribution?
- Has the fixture been tested from normal viewing angles?
This checklist can be particularly useful when comparing several outdoor lighting suppliers.
What About Outdoor Lights That Are Too Bright?
If your problem is simply that an existing outdoor fixture produces excessive brightness, the solution may involve changing the fixture output, dimming, aiming, shielding, or replacing the fixture.
But how to reduce glare in outdoor lighting is a broader design question.
Glare can still exist even when total light output is not particularly high.
The key difference is:
Brightness = how much light is produced.
Glare = how uncomfortable or visually disturbing that light can be to the observer.
That is why reducing glare requires more than simply reducing wattage.
If you are dealing with excessively bright fixtures, you can also read our related guide:
Why Do Outdoor Lights Look Too Cold? How to Choose the Right Color Temperature
About DFMJ Lighting
DFMJ Lighting focuses on outdoor lighting for wholesalers, distributors, contractors, and project buyers.
Our product range includes:
- Outdoor wall lights
- Garden lights
- Landscape lighting
- Outdoor step lights
- Inground lights
For project applications, product selection should consider more than appearance and unit price.
The optical design, housing, waterproof protection, materials, installation requirements, and intended application should all work together.
You can explore our outdoor lighting solutions here:
DFMJ Lighting — Outdoor Lighting Manufacturer
For projects that require ground-level or landscape applications:
FAQ: How to Reduce Glare in Outdoor Lighting
How to reduce glare in outdoor lighting?
Use suitable beam angles, shielding, mounting heights, light distributions, color temperatures, and fixture spacing. Most importantly, test the fixture from normal viewing positions before final installation.
Does a wider beam angle reduce glare?
A wider beam angle can help distribute light more broadly, but it does not automatically eliminate glare. Fixture brightness, shielding, mounting position, optics, and viewing angle also matter.
Does mounting height affect outdoor lighting glare?
Yes. Mounting height changes the viewing angle and the way light reaches the target area. The appropriate height depends on the fixture, beam angle, application, and surrounding environment.
Does color temperature affect glare?
Color temperature can affect visual perception and the atmosphere of a space, but it is not a direct solution for glare. Proper shielding and optical control are more important.
How can I reduce glare from outdoor wall lights?
Choose wall lights with controlled light distribution, appropriate shielding, and a suitable mounting position. Avoid fixtures where a high-intensity LED source is directly visible from common pedestrian viewing angles.
What is the best way to test outdoor lighting for glare?
Install a sample at or near the intended mounting height and observe it from normal viewing positions. Check the direct visibility of the LED source, light distribution, brightness, and surrounding surfaces.
Final Takeaway
How to reduce glare in outdoor lighting is not about making every outdoor light less bright.
It is about controlling the light.
Start with:
Beam Angle → Shielding → Mounting Height → Light Distribution → Color Temperature → Spacing → Real-World Testing
When these factors are considered together, outdoor lighting can provide useful illumination while creating a more comfortable visual environment.
For B2B projects, I would always recommend testing the actual fixture and layout before committing to a large installation.
Good outdoor lighting is not simply about producing more light. It’s about putting the right light in the right place.